Showing posts with label móc thú nhồi bông. Show all posts

Móc thú dễ thương thỏ cách điệu

Mình ít xem hoạt hình nên không biết con này là con gì nhưng mình thấy có tai thỏ, và có sừng :)
Móc thú dễ thương thỏ cách điệu


Chú thích
X Mũi đơn
O Mũi bính
V 2 mũi đơn vào 1 chân/ mũi tăng
A Chụm 2 mũi thành 1/ mũi giảm
*   * 3 thực hiện *   * 3 lần

Mình ít xem hoạt hình nên không biết con này là con gì nhưng mình thấy có tai thỏ, và có sừng :)
Móc thú dễ thương thỏ cách điệu


Chú thích
X Mũi đơn
O Mũi bính
V 2 mũi đơn vào 1 chân/ mũi tăng
A Chụm 2 mũi thành 1/ mũi giảm
*   * 3 thực hiện *   * 3 lần

Cách móc ốc sên dễ thương chart Việt


Chart mình tự dịch, phần nào các bạn không hiểu thì comment phía dưới mình sẽ giải thích nhé

Chú thích
X Mũi đơn
V 2 mũi đơn vào 1 chân/ mũi tăng
A Chụm 2 mũi thành 1/ mũi giảm
O Mũi dời


Chart mình tự dịch, phần nào các bạn không hiểu thì comment phía dưới mình sẽ giải thích nhé

Chú thích
X Mũi đơn
V 2 mũi đơn vào 1 chân/ mũi tăng
A Chụm 2 mũi thành 1/ mũi giảm
O Mũi dời

Cách móc thú nhồi bông căn bản cho người mới biết móc

Dưới đây là một số tài nguyên mà Ad đã sưu tầm được và ad khuyên bạn nên truyền lại những điều này cho những người mới "nhập môn", điều này sẽ giúp ích họ rất nhiều.

Nguyên vật liệu, "đạo cụ":

Dưới đây là một số tài nguyên mà Ad đã sưu tầm được và ad khuyên bạn nên truyền lại những điều này cho những người mới "nhập môn", điều này sẽ giúp ích họ rất nhiều.

Nguyên vật liệu, "đạo cụ":

Cách móc Shin chan Cậu bé bút chì free

Cách móc Shin chan Cậu bé bút chì free

Cách móc Shin chan Cậu bé bút chì free

Hướng dẫn móc Penny The Penguin


Materials:
Acrylic yarn - White (turquoise or blue, white, pale yellow or orange, grey)
Stuff of your choice (I normally prefer polyfill)
One pair of black beads / plastic eyes (size of your choice)
Black embroidery floss (for attaching the black beads as eyes)

Tools:

Crochet hook size C (or any crochet hooks suitable for the yarn you use)
Tapestry needle & Sewing needle for yarn

Finished Size:
Approximately 11cm tall. (I use a Clover size C crochet hook.)
*Your finished doll might finish in bigger or smaller than mine depending on your tension and
the yarn you use.*

Abbreviation:
R = Round
ch = chain
sc = single crochet
st = stitch
inc = increase (2sc in a stitch)
dec = decrease (2sc off together)
sl st = slip stitch(es)
* = repeat directions between * and * as many as indicated
() = number of stitches in each round

NOTES:
1) Work in continuous spiral round; do not join rounds unless otherwise stated. Mark first stitch of each round.
2) To change color, work last st of old color to last yarn over. Yarn over with new color and draw through all loops on hook to complete st.

Penguin x 1 (blue & white colour)
Start with blue color; make adjustable rings
R1: 6 sc in rings (6)
R2: inc 6 (12)
R3: *sc 1, inc 1*, repeat 6 times (18)
R4: *sc 2, inc 1*, repeat 6 times (24)
R5: *sc 3, inc 1*, repeat 6 times (30)
R6: *sc 4, inc 1*, repeat 6 times (36)
R7: *sc 5, inc 1*, repeat 6 times (42)
R8: 1 sc in each stitch (42)
R9: *sc 6, inc 1*, repeat 6 times (48)
R10: 1 sc in each stitch (48)
R11: *sc 7, inc 1*, repeat 6 times (54)
R12 - R15: 1 sc in each stitch (54)

Everything is in blue from R1 to R15. You need to change colour for the remaining rounds.
R16: sc 18 (blue), sc 18 (white), sc 18 (blue) (54)
R17: sc 17 (blue), sc 20 (white), sc 17 (blue) (54)
R18 - R22: sc 16 (blue), <sc 22 (white)>, sc 16 (blue) (54)
R23: <dec 1,sc 7, dec 1, sc 5> (blue), <sc 2, dec 1, sc 7, dec 1, sc 9> (white), <sc 1, dec 1, sc 4, dec 1, sc 7> (blue)(48)
R24: <sc3, dec 1, sc 6, dec 1, sc 2> (blue), <sc 4, dec 1, sc 6, dec 1, sc 5> (white), <sc 1, dec 1, sc 6, dec 1, sc 3> (blue) (42)
R25: <dec 1, sc 5, dec 1, sc 5> (blue), <dec 1, sc 5, dec 1, sc 7> (white), <sc 2, dec 1, sc 1, dec 1, sc 5> (blue) (36)
R26: <sc 3, dec 1, sc 4, dec 1, sc 1> (blue), <sc 3, dec 1, sc 4, dec 1, sc 3> (white), <sc 1, dec 1, sc4, dec 1, sc 1> (blue) (30)
R27: <dec 1, sc 3, dec 1, sc 3> (blue), <dec 1, sc 3, dec 1, sc 3, dec 1> (white), <sc 3, dec 1, sc 3> (blue) (24)

Change to white:
R28: *sc 2, dec 1*, repeat 6 times (18)
R29: *sc 1, dec 1*, repeat 6 times (12) <start stuffing polyfill>
R30: *dec 1*, repeat 6 times (6)

Close with sl st, leaving a long tail for sewing. Weave tail through last round and gather tightly. Knot to secure.

Edit: 21/12/2012 - There is slight error in R2 which i amend it. Will post up either photo tutorial / video soon! thanks! Beak: (orange color)
We are going to crochet an oval and fold into half before sew & attach it to the body of penguin. Click here for the extra helpful video tutorial about how to crochet an oval. (Note: the number of sc in my pattern & the video tutorial is different)
Start with orange color, make 11 ch, (last chain is a 'turning chain' which will not be worked into later)
R1: sc 9, inc 2, sc 8, inc 1, sl st (22)

R2: Ch 1, inc 1, sc 8, inc 5, sc 8, inc 3, sl st (28)
R3: Ch 1, inc 1, sc 9, inc 1, sc 1, inc 1, sc 1, inc 1, sc 9, inc 1, sc 1, inc 1, sc 1, sl st (34)
R4: Ch 1, inc 1, sc 10, inc 1, sc 2, inc 1, sc 2, inc 1, sc 10, inc 1, sc 2, inc 1, sc 2, sl st (40)


Fasten off & leave a long tail for sewing. Remember to fold into half before sewing & attach it to the R15 of the penguin.


Video source: http://www.purplebutterflycrochetcollection.com/


** Alternatively, if you are still clueless on how to crochet an oval, you could try this pattern for making the beak.Start with orange yarn, make adjustable rings
R1: 6 sc in rings (6)
R2: inc 6 (12)
R3: *sc 1, inc 1*, repeat 6 times (18)
R4: *sc 2, inc 1*, repeat 6 times (24)
R5: *sc 3, inc 1*, repeat 6 times (30)
Fasten off & leave a long tail for sewing. Remember to fold into half before sewing & attach it to the R15 of the penguin. **

Edit: 21/12/2012 (the pattern for the wings was written wrongly. It's for another penguin that is now shown here. Thanks EV MC for pointing this out =)) Wings: (Make 2, blue colour)
Start with adjustable rings
R1: 6 sc in rings (6)
R2: inc 6 (12)
R3: *sc 3, inc 1*, repeat 3 times (15)
R4: 1 sc in each stitch (15)
R5: 1 sc in each stitch (15)
R6: *sc 3, dec 1*, repeat 3 times (12)
Fasten off & leave a long tail for sewing. Remember to fold into half before sewing & attach it to the R17 on each side of the penguin.

Feet: (Make 2, orange colour)
Start with adjustable rings
R1: 6 sc in rings (6)
R2: *inc 1, sc 1*, repeat 3 times (9)
R3: *inc 1, sc 2*, repeat 3 times (12)
R4: **sc 2, dec 1*, repeat 3 times (9)
R5: *sc 1, dec 1*, repeat 3 times (6)
Fasten off & leave a long tail for sewing.

*Sew all parts together & a pair of platic eyes*

Ta-dah!! You are done!!!

***This is my very first time writing pattern. Feel free to convo me if you are stuck in the middle or you find some error in the pattern***


Do leave me a comment if you like to have the pattern for making the bunny hat =) Happy crocheting!

Update: Click here for the bunny hat pattern =)


** This pattern is for personal use only. Copyright is reserved. You may not use this pattern or doll produced from this pattern for retail or commercial purposes. **


Các bạn có thể xem thêm nhiều hướng dẫn khác tại:

Tip đổi màu len thẳng hàng trong móc thú nhồi bông


The Perfect Crochet Color Change


I don’t know about you, but I dislike color changes in crochet-in-the-round intensely. I just hate (a strong word, I know, but still) the way the new color “bites” into the old color making a jagged and obvious border. I just HAD to find a solution to the problem.

So I huffed, and I puffed and I… No, wait. There was no actual huffing or puffing, I set my mind and crochet hook to the task, and figured it out.

It’s actually very simple.
First Round

Single crochet as instructed by your pattern. Change color in the last stitch of the round – final yarn over and pull through with the new color.

Second Round

Slip stitch in back loops only for the entire round.


This is how it looks when the slip stitch round is done:

Third Round

Single crochet in back loops only for the entire round.


Fourth Round

Continue crocheting as your pattern indicates.

Isn’t that a nice, clean, straight color change?


Even the back looks nice. The “step” caused by the color change is barely visible. If you join at the end of the round (instead of the continuous rounds I used for this example) you won’t see it at all.


Enjoy!

Hướng dẫn móc thỏ bằng len handmade


Chú thích:

st = stitch (mũi, chân)
sc = single crochet (mũi đơn)
sl st = slip stitch (mũi dời)
f/o = finish off
2tog = mũi giảm


Starting at the top of the head working down to bottom of body: (đầu và body)
1) magic circle or adjustable loop with 6st (6)
2) 2sc in each (12)
3) 1sc then 2sc in next st (18)
4) 1sc in next 2st then 2sc in next st (24)
5-7) 1sc in each st for 3 rows
8) 1sc in next 3st then 2sc in next st (30)
9-11) 1sc in each st for 3 rows
12) 1sc in next 3st then 2tog (24)
13) 1sc in next 2st then 2tog (18)
14) 1sc then 2tog (12) * stuff head, shape as you stuff. See video (time at 11:21) for tips on stuffing
15) 1sc in each st
16) 2sc in each (24)
17-19) 1sc in each st for 3 rows
20) 1sc in next 3st then 2sc in next st (30)
21-22) 1sc in each st for 2 rows
23) 1sc in next 3st then 2tog (24)
24) 1sc in next 2st then 2tog (18)
25) 1sc then 2tog (12) * stuff body firmly and shape as you stuff
26) 1sc then 2tog (8) stuff more if needed
27) *2tog* 2 and f/o. Weave yarn tail in and out the remaining stitching and pull tight to close the gap. Knot off and hide yarn tail in body

Ears (tai):
1) magic circle or adjustable loop with 6st (6)
2) 2sc in each (12)
3) 1sc then 2sc in next st (18)
4-6) 1sc in each st for 3 rows
7) 1sc in next 4st then 2tog (15)
8) 1sc in each st
9) 1sc in next 3st then 2tog (12)
10-12) 1sc in each st for 3 rows
13) 1sc in next 4st then 2tog (10)
14) 1sc in each st
sl st and f/o leaving a long tail for sewing. Do not stuff

Arms (tay):
1) magic circle or adjustable loop with 6st (6)
2) 2sc in each (12)
3-4) 1sc in each st for 2 rows
5) 1sc in next 2st then 2tog (9)
6) 2tog then 1sc in next 7st (8)
7-11) 1sc in each st for 5 rows
sl st and f/o leaving a long tail for sewing. Lightly stuff hand, do not stuff arm.

Legs (chân):
1) magic circle or adjustable loop with 6st (6)
2) 2sc in each (12)
3) 1sc then 2sc in next st (18)
4-6) 1sc in each st for 3 rows
7) (2tog then 1sc in next st, repeat 4 times) 1sc in next 6st (14)
8) (2tog then 1sc in next st, repeat 3 times) 1sc in next 5st (11)
9) 2tog then 1sc in next 9st (10)
10-13) 1sc in each st for 4 rows
sl st and f/o leaving a long tail for sewing. Stuff and shape foot and stuff leg
*For the toes, read assembly section below

Tail (đuôi):
I used a pom pom for this bunny which I show you how to do in the video tutorial. It's quick and easy and you do not need any tools other than your fingers and yarn.
Wrap about 75 or 80 times around 3 fingers. Tie off the middle. Cut through the loops. Trim and then sew to the bunny.

Hoặc xem video hướng dẫn cuối trang


Assembly:
If you assemble the doll in the order I give you then you will not have to worry so much about centering the different parts as much.

1) Sew the arms on. These get sewn directly under the head
(may tay vào ngay dưới đầu)
2) sew on the legs. How you sew the legs on is up to you. I wanted this bunny to be in a standing position so I sewed them on in a way the doll stands up. View the video on how to do this at 32:25 minutes
(May chân, tùy vào các bạn muốn thỏ đứng hoặc ngồi có thể may vào vị trí khác nhau)
3) sew on the ears. Pin them in place before sewing them in helps. But again, view the video for tips on sewing this part. Also you can add in a pipe cleaner to make the ears poseable if desired. Simply bend over a pipe cleaner and push the bend inside the ear. Add in a few stitches to ensure the pipe stays put.
(May tai vào,)
4) sew on pom pom tail
(May đuôi vào)
5) you can add in toes or leave the foot as is. Wrap yarn around the front of the foot in 3 different sections. Pull tight and bring yarn tails out through the leg, knot them off and hide inside the leg. Go over the yarn lines with a brown or black embroidery thread to give the toes some definition. View video at 46:43 for how to do this.
6) Add in the face. See video for the different options. I show how to add in the nose and mouth and also how to paint in the eyes or use French Knots for eyes


This is one placement for the ears but you can also sew them up a bit higher and closer together. Try different areas on the top of the head and make sure you are happy with the placement before sewing them permanently in. View the video for placement and sewing tips


Link video:
https://www.youtube.com/watch?v=skFjBDjcQ4w&feature=youtu.be


Nguồn:

Cách móc chó con dễ thương bằng len

Puppy Amigurumi – Tammy


I “Ruff” U, Puppy Amigurumi: Tammy

Contributed by: Lee Mei Li of AmiguruMEI
Skill level: Intermediate
Duration: About 4 hours
Finished size: about 3″ tall

Abbreviations
• Ch: chain
• Sc: single crochet
• Dc: double crochet
• Inv dec: invisible decrease

Materials
• 2.3mm hook
• Yarn in white, cyan and fuchsia
• Crochet thread in black
• 2 x 4mm black brads
• White felt
• Pink blush
• Darning needle
• Polyester fiberfill

Head
Start with cyan yarn.
Round 1: Sc 6 in magic ring {6}.
Round 2: [Inc] around {12}.
Round 3: [Inc, sc 1] around {18}.
Round 4: [Inc, sc 2] around {24}.
Round 5: [Inc, sc 3] around {30}.
Round 6: [Inc, sc 4] around {36}.
Round 7-8: Sc around {36}.
Round 9: Sc in the next 12 sts, change to white yarn and sc in the next 5 sts, change back to cyan and sc in the next 2sts, change to white and sc in the next 5 sts then change to cyan and sc in the next 12 sts {36}.
Round 10-11: Sc in the next 12 sts (cyan), sc in the next 12 sts (white), sc in the next 12 sts (cyan) {36}.
Round 12: Change to white yarn. Sc around {36}.
Round 13: [Inv dec, sc 4] around {30}.
Round 14: [Inv dec, sc 3] around {24}.
Round 15: [Inv dec, sc 2] around {18}.
Stuff.
Round 16: [Inv dec, sc 1] around {12}.
Round 17: [Inv dec] around {6}.
Fasten off and weave in ends. Leave a long end.
To make eye indentations: Using the remaining end of the yarn, thread it through a stitch at the left side of the head below Round 11. Make a horizontal backstitch. Repeat on the other side. Bring yarn to the bottom of the head and trim excess.

Body
Start with white yarn.
Round 1: Sc 6 in magic ring {6}.
Round 2: [Inc] around {12}.
Round 3: [Inc, sc 1] around {18}.
Round 4: [Inc, sc 2] around {24}.
Round 5: Sc in the next 20 sts, change to cyan yarn and sc in the next 4 sts {24}.
Round 6-9: Sc in the next 4 sts (cyan), sc in the next 16 sts (white), sc in the next 4 sts (cyan) {24}.
Round 10: In the first 4 sts, inv dec, sc 2 (cyan). In the next 16 sts, inv dec, sc 2 (white). In the last 4 sts, inv dec, sc 2 (cyan) {18}.
Fasten off and leave a long end for sewing.

Ears
Make 2 with cyan yarn.
Round 1: Sc 6 in magic ring {6}.
Round 2: [Inc] around {12}.
Round 3-10: Sc around {12}.
Fasten off and leave a long tail for sewing.

Muzzle
Use white yarn.
Round 1: Sc 5 in magic ring {5}.
Round 2: Sc around {10}.
Fasten off and leave a long tail for sewing.

Arms
Make 2 with white yarn.
Round 1: Sc 6 in magic ring {6}.
Round 2-5: Sc around {6}.
Fasten off and leave a long tail for sewing.

Feet
Make 2 with white yarn.
Round 1: Sc 6 in magic ring {6}.
Round 2: [Inc] around {12}.
Round 3: Sc around {12}.
Round 4: [Inv dec] around {6}.
Fasten off and weave in ends but leave a long tail for sewing.
Flatten.

Tail
Use white yarn.
Round 1: Sc 3 in magic ring {3}.
Round 2: [Inc] around {6}.
Round 3: [Inc, sc 1] around {9}.
Round 4: Sc around {9}.
Round 5: [Inv dec, sc 1] around {6}.
Round 6: Sc around {6}.
Fasten off and leave a long tail for sewing.

Heart
Use fuchsia yarn. This pattern is made by joining two pieces together.
To make the first piece:
Round 1: Sc 8 in magic ring {8}.
Round 2-3: Sc around {8}.
Fasten off and leave a long end for sewing.

To make the second piece:
Round 1: Sc 8 in magic ring {8}.
Round 2-3: Sc around {8}.
Round 4: This will be where the two pieces join. Sc in the next 6 sts, then continue on to sc in the sts of the first heart piece. When you reach back to the second heart piece, sc in the remaining sts {16}. (you may use excess yarn from the first piece to tighten any gaps between the two pieces)
Round 5: [Inv dec, sc 2] around {12}.
Round 6: [Inv dec, sc 1] around {8}.
Round 7: [Inv dec] around {4}.
Fasten off and weave in ends. Leave a long end for sewing.

Assembly
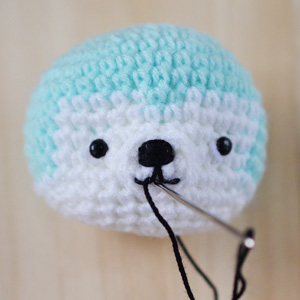
1. Sew muzzle onto head.
2. Using black crochet thread, sew on the nose using a series of horizontal backstitches. We made a total of 11 backstitches for tiny Tammy.
3. With the remaining black crochet thread, sew a W shape for the lips. Make tiny backstitch loops near the curves to turn it into a smile. Try using your darning needle to push the curves into place.
4. Cut white felt into two small crescent shapes, matching the size of the black brads. Pair them up with the black brads and glue them onto where the eye indentations are.
5. Sew on the body, arms, feet, ears and tail.
6. Sew heart onto the front of the body.
7. Add a pop of blush onto Tammy’s cheeks.

Make eye indentations by sewing a horizontal backstitch at a spot on the right and left side of the head below Round 11.

Sew muzzle onto head.

Glue on black brads as eyes.

Sew on the nose using a series of horizontal backstitches.

Sew on the lips.

Make tiny backstitch loops near the curves to turn it into a smile.

Try using your darning needle to push the curves into place.

Pins parts to the body and sew them on.

Sew heart onto the front of the body.


Móc búp bê bằng len cho bé chơi

Mẫu búp bê đẹp sưu tầm cách móc


Tarifte Kullandığım Semboller ve Anlamları


X : Sıkiğne bakınız
V : Artırma bakınız
A : Eksiltme bakınız
BLO: Back loop, arka loptan örme bakınız
CC: ilmek kaydırma bakınız
HDC: Tekli trabzan bakınız.
DC: İkili Trabzan bakınız.
DTR: Üçlü Trabzan bakınız.
W : Aynı yere 3 sıkiğne
M: 3 sıkiğne birlikte eksiltme
VHDC: Aynı yere iki HDC
VDC: Aynı yere iki DC
Renk değiştirme bakınız


ŞEKER KIZ YAPILIŞI

KAFA
Ten rengi iplikle
1. 6X
2. (V)*6=12
3. (X,V)*6=18
4. (2X,V)*6=24
5. (3X,V)*6=30
6. (4X,V)*6=36
7. (5X,V)*6=42
8. (6X,V)*6=48
9. (7X,V)*6=54
10. (8X,V)*6=60

11-23. 60X
24. (8X,A)*6=54
25. (7X,A)*6=48
26. (6X,A)*6=42
27. (5X,A)*6=36
28. (4X,A)*6=30
29. (3X,A)*6=24
30. (2X,A)*6=18
31. (X,A)*6=12
32. (A)*6=6


NOT : 16-17.Sıralar arasına arada 5 sıkiğne kalacak şekilde gözler monte edilir.
Gözlerin nasıl takıldığını öğrenmek için BAKINIZ.
Göz çukuru nasıl oluşturulur öğrenmek için BAKINIZ.
Kirpik nasıl yapılır öğrenmek için BAKINIZ.

GÖVDE
Beyaz renk iplikle başlıyoruz.Bluz için.
1. 6X
2. (V)*6=12
3. (X,V)*6=18
4-5. 18X
6. (2X,V)*6=24
7. 24X
8. (3X,V)*6=30
9. 30X
10. (4X,V)*6=36
11. 36X
12. (5X,V)*6=42
13-14. 42X
15. (6X,V)*6=48
16. 48X
17. (7X,V)*6=54
18. 54X
Pembe renk ipliğe geçiyoruz.
19. 54X
20. (8X,V)*6=60
21. 60X
22. (4X,A9*10=50
23. (3X,A)*10=40
24. (2X,A)*10=30
25. (4X,A)*5=24
26. (3X,A)*5=20
27. (2X,A)*5=16
28. (A)*8=8

ELLER
Ten rengi ile başlıyoruz.
1. 6X
2. (V)*6=12
3. (X,V)*6=18
4-5. 18X
6. (7X,A)*2=16
7. 16X
8. 6X, 4'lü POPCORN (Parmak için), 9X
9. (6X,A)*2=14
10. 14X
11. (5X,A)*2=12
Beyaz bluz rengine geçiyoruz.
12. 12X
13. 12X BLO olarak
14-21. 12X
Dikmek için 10cm kadar iplik bırakıyoruz.

- 8.sırada BLO olarak ördüğümüz kısmında boşta kalan FLO kısmına beyaz ipliğimizi takıyoruz ve 3 zincir çekip yandaki FLO'ya CC ile bağlıyoruz. Sıra sonuna kadar bu şekilde çalışıyoruz.

NOT : Kolun üst kısmını fazla doldurmuyoruz,aksi takdirde kollar gergin olur ve yanlara doğru açık kalır.

AYAK ve BACAKLAR
Beyaz renk ile başlıyoruz. Çorap rengi.
1. 6X
2. (V)*6=12
3. (X,V)*6=18
4. (2X,V)*6=24
5. (3X,V)*6=30
6-11. 30X
12. (13X,A)*2=28
13.28X
14. (12X,A)*2=26
15. 26X
16. (11X,A)*2=24
17. 24X
18. (10X,A)*2=22
19. 22X
20. (9X,A)*2=20 içini dolduruyoruz.
21. (M)*6 , A Kapatıyoruz.

Bacak için beyaz renk iplikle, ördüğümüz ayağın üzerineden daire şeklinde 15 sıkiğne topluyoruz,
1-6. 15X
Ten rengi ipliğe geçiyoruz.
7. BLO olarak 15X
8-19. 15X
Pembe renk iplikle
20. 15X
21. BLO olarak (4X,A)*3=18
22-25. 18X
Bacağı dikmek için 15cm kadar iplik bırakın.

- 7. ve 21. sıralarda BLO yaptığımız yerin FLO'suna koldaki gibi ipliğimizi takıp , sıra sonuna kadar 3zincir bir CC yapıyoruz.
NOT: Bacaklar daha uzun olsun isterseniz ten rengi ile ördüğünüz kısmı biraz daha uzatabilirsiniz.

AYAKKABI
1. 8 zincir çekip 2.zincirden itibaren 6X,aynı yere 3X, 6X,aynı yere 3X =18
2. 6X, (V)*3, 6X, (V)*3=24
3. 3X, HDC, 2DC, (VDC)*6, 2DC, HDC, 3X, (V,X)*3=33
4. 3X, 2HDC, 5DC, (VDC)*6, 5DC, 2HDC, 2X, (X,V)*4=43
5. BLO olarak 43X
6-9. 43X
10. 8X, 2HDC, 8A HDC, 2HDC, 15X =35
11. 8X, 12HDC, 15X=35
12. 8X, 2HDC, 4A HDC, 2 HDC, 9X, 3A=28

- Ayakkabı bağcığı için önce ayakkabıyı ayağa giydirin, uygun yere ipliğinizi takın ve 8 zincir çekin, karşı tarafa CC ile bağlayıp geri dönün ve zincirin üzerine 8 HDC yapın. İplikleri gizleyin.

Ayakkabının taban şeması;


BURUN
Ten rengi iplikle
1. 6X
2. 6X
Dikiş için iplik bırakın.

KULAK

Sihirli halka içerisine 9DC yapıp göz seviyesinde dikiyoruz.

ELBİSE
Üst Kısım
26 zincir çekiyoruz.
1. 1 zincir çek dön,25X
2. 6 zincir çek,dön, 5DTR, 2 zincir, 10DTR, 2 zincir, 6DTR
3. 1 zincir.dön, 25X

Alt Kısım
Üst kısımdan devam,
4. Renk değiştiriyoruz, 3 zincir,dön,(VDC,X) sıra sonuna kadar
5. 3 zincir,dön, (2DC, 1 arkadan DC) sıra sonuna kadar
6. 3 zincir,dön, [DC,Aynı yere (1DC, 1 önden DC)] sıra sonuna kadar
7. 3 zincir çek,bu kez dönmüyoruz, [2 DC, aynı yere (1DC,1 önden DC)] sıra sonuna kadar, sırasnın sonunda ilk DC ye CC ile bağla
8. 3 zincir, [3DC,aynı yere (1DC,1 önden DC)] sıra sonuna kadar, CC

NOT: Etek kısa gelirse, sayıları artırarak örmeye devam edebilirsiniz.
- Önden ve arkadan DC nasıl yapıldığı elbise şeması üserinde gösterilmiş.
Elbisenin şeması


AÇIKLAMA:


Kafayı gövdeye dikmeden önce, gözleri monte edin, kulakları ve burnu dikin.
Kolları dikmek için BAKINIZ.
Bacakları da kollar gibi dikebilirsiniz, ya da dik durmasını istiyorsanız, kafa ile gövdeyi birbirine diktiğiniz şekilde bacakları gövdeye dikebilirsiniz.
Elbiseye düğme için ilik yeri yapmak istiyorsanır, üst kısımdaki 26 zincire 8 zincir daha ekleyip 9 zincirden itibaren üst kısmı örmeye devam edebilirsiniz.
Eğer ayakkabıyı da düğme ayrıntılı yapmak isterseniz. ipinizi ayakkabıya taktıktan sonra karşı tarafa gidip dönmeye yetecek kadar, mesela 20 zincir çekip başladığınız yere CC ile bağlayın.
Eğer bebeğinize benimki gibi boyun yapmak isterseniz kafanın sondan ikinci sırasına eldiğinizde 12X olan kısmı birkaç sıra devam ettirin.Boyun kısmının dik durması için de bir kablonun uçlarını eğerek kafaya ve gövdeye geçirerek dikin.

Móc gấu nhỏ mặc áo ấm dễ thương

Sweater bearies

Materials:

- Yarn scraps in various colors of your choice ( body color, muzzle color, sweater color, two different sweater stripe colors).
- Black beads for the eyes.
- Embroidery floss for the nose.
- A hook appropriate to the weight of the yarn. I personally used fingering weight yarn and a 2.0 mm hook, which resulted in a 3 inch bear.
- Yarn needle.
- Polyfill.

Note: When switching colors, the last loop you pull through the stitch before the switch already has to be in the new color.

Torso
The torso is worked in the round in rows, not a spiral. This is to make sure the color changes line up neatly.

R1: Using the body color of your choice, make 6 sc into a ring, sl st to close.
R2: ch 1, sc inc in next st, around, sl st to close (12)
R3: ch 1, sc inc in next st, sc in next st, around, sl st to close (18)
R4: ch 1, sc around, sl st to close (18) Change to the sweater color.
R5: ch 1, sc around, sl st to close (18)
R6: ch 1, sc next 2 st tog, sc in next 16 st, sl st to close (17) Change to stripe color A.
R7: ch 1, sc around, sl st to close (17) Change to stripe color B.
R8: ch 1, sc in next 8 st, sc next 2 st tog, sc in next 7 st, sl st to close (16)
R9: ch 1, sc around, sl st to close (16) Change to stripe color A.
R10: ch 1, sc in next 12 st, sc next 2 st tog, sc in next 2 st, sl st to close (15) Change to the sweater color.
R11: ch 1, sc around, sl st to close (15) Fasten off and stuff.

Head
R1: Using the body color of your choice, make 6 sc into a ring.
R2: sc inc in next st, around (12)
R3: sc inc in next st, sc in next st, around (18)
R4: sc inc in next st, sc in next 2 st, around (24)
R5: sc inc in next st, sc in next 3 st, around (30)
R6: sc inc in next st, sc in next 4 st, around (36)
R7-R12: Work even (36)
R13: sc next 2 st tog, sc in next 4 st, around (30)
R14: sc next 2 st tog, sc in next 3 st, around (24)
R15: sc next 2 st tog, sc in next 2 st, around (18)
R16: sc next 2 st tog, sc in next 4 st, around (15) Fasten off and stuff.

Muzzle
R1: Using the muzzle color of your choice, make 6 sc into a ring.
R2: sc inc in next st, around (12) Fasten off.

Embroider the nose, then sew the muzzle to the head. After that, sew the head to the torso. Make sure to orient the seam of the torso color changes towards the side, so that it will be hidden by the bear's left arm.
Sew on black beads for eyes, set wide and low.

Ears (make two)
R1: With the body color of your choice, make 6 sc into a ring.
R2: sc inc in next st, around (12)
R3: sc inc in next st, sc in next st, around (18)
R4-R5: Work even (18) Fasten off.

Don't stuff the ears, but fold them flat. Sew them to the head at a curve, so they are nicely cupped.

Arms (make two)
R1: With the body color of your choice, make 6 sc into a ring.
R2: sc around (6) Change to the sweater color.
R3-R7: Work even (6) Fasten off and sew to the torso.

Collar
R1: ch 19, turn, sc in the 2nd ch from the hook, sc in next 17 ch. Fasten off.

Wrap the collar around the neck of the bear, wrong side of the stitches facing outward. Secure at the back of the neck.

Legs (make two)
R1: With the body color of your choice, make 6 sc into a ring.
R2-R4: Work even (6) Fasten off and sew to the torso.

Read more: http://www.craftster.org/forum/index.php?topic=353505.msg4130120#msg4130120#ixzz2vp25pLlX

Cách móc gấu bông bằng len

Nhân ngày chuẩn bị đám cưới của mình :) mình móc 1 cặp gấu bông để chụp hình, trưng bàn và kỷ niệm của 2 đứa luôn.
Cách móc gấu bông bằng len

Chuẩn bị:
Mình móc bằng cotton việt nam cho ko bị xù, móc vòng tròn liền, liên tục (dạng xoắn ốc)
Móc chập 3 sợi nhé
Kim móc 4mm

Cách thực hiện
Đầu:
h1 : 6X ( 6 )
h2 : 6V ( 12 )
h3 : XV ( 18 )
h4 : 2XV ( 24 )
h5 : 3XV ( 30 )
h6 : 4XV ( 36 )
h7 : 5XV ( 42 )
h8 : 6XV ( 48 )
h9 : 7XV ( 54 )
h10 : 8XV ( 60 )
h11 : 9XV ( 66 )
h12 : 10XV ( 72 )
h13 : 11XV ( 78 )
h14-24 : 78X ( 78 )
h25 : 11XA ( 72 )
h26 : 10XA ( 66 )
h27 : 9XA ( 60 )
h28 : 8XA ( 54 )
h29 : 7XA ( 48 )
h30 : 6XA ( 42 )
h31 : 5XA ( 36 )
h32 : 4XA ( 30 )
h33 : 3XA ( 24 )

Miệng (len trắng):
h1 : 6X ( 6 )
h2 : 6V ( 12 )
h3 : XV ( 18 )
h4 : 2XV ( 24 )
h5 : 3XV ( 30 )
h6 : 4XV ( 36 )
h7 : 36X ( 36 )

Tai (2 cái):
h1 : 6X ( 6 )
h2 : 6V ( 12 )
h3 : XV ( 18 )
h4 : 2XV ( 24 )
h5 : 3XV ( 30 )
h6 : 4XV ( 36 )
h7-10 : 36X ( 36 )
h11 : 4XA ( 30 )

Body (mình):
h1 : 6X ( 6 )
h2 : 6V ( 12 )
h3 : XV ( 18 )
h4 : 2XV ( 24 )
h5 : 3XV ( 30 )
h6-16 : 30X ( 36 )
h17: 8XA*3 lần ( 27 )
h18 : 27X (27)
h19 : 7XA*3 lần (24)

Tay: (2 cái)
len trắng:
h1 : 6X ( 6 )
h2 : 6V ( 12 )
h3 : XV ( 18 )
h4-5 : 18X (18)
Chuyển sang màu cafe sữa:
h6-11 : 18X (18)
h12 : 4XA*3 (15)
h13-14: 15X (15)
h15: 3XA*3 (12)
h16-17: 12X (12)
h18: 6A (6)

Chân (2 cái)
len trắng:
h1 : 6X ( 6 )
h2 : 6V ( 12 )
h3 : XV ( 18 ) 
h4: 2XV (24)
h5-7: 24X (24)
Len cafe sữa:
h8-11: 24X (24)
h12: 6XA*3 (21)
h13-14: 21X (21)
h15: 5XA*3 (18)
h16-17: 18X (18)
h18: 4XA*3 (15)
h19: 15X (15)
h20: 3XA*3 (12)
h21: 6A (6)

Nhồi gòn rồi may các bộ phần lại nhé
bạn nào muốn tay chân cử động được thì mình khâu nút áo liền 1 lúc 2 chân (tay), qua lỗ nào của len thì về cũng lỗ đó của len nhé

Móc thú nhồi bông con cua bằng len


I hate to complain, but being in the summer heat and almost 9 months pregnant has left me a little CRABBY. But this cute little crochet crab is cheering me right up! He measures about 8 inches across (from big claw to big claw) and about 3 inches wide. This is a fun little amigurumi project to make to celebrate summer!


Materials:
- Lion Brand Vanna's Choice yarn in Scarlet Red and White
- Poly-fil
- Size H Crochet Hook
- Small Safety Eyes
- Tapestry Needle
- Stitch Marker


Abbreviations:
Magic Ring
SC = Single Crochet
SC Decrease = Single Crochet Decrease. I used the Invisible SC Decrease.


Body Pattern:
Magic ring, chain 1 in ring and make 10 SC in ring, continue to crochet in rounds
Rd 2: 2 SC in each stitch around (20 SC)
Rd 3: 2 SC in first stitch, SC in next, repeat around (30 SC)
Rd 4-8: SC in each stitch around (30 SC)
Rd 9: SC decrease in first stitch, SC in next, repeat around
Rd 10: SC in each stitch around
Rd 11: SC decrease in each stitch around until closed
Stuff before completely closing.

Big Claw:
Magic ring, chain 1 in ring, make 4 SC in ring, continue to crochet in rounds
Rd 2: 2 SC in first stitch, SC in next, repeat around (6 SC)
Rd 3: SC in each stitch around (6 SC)
Rd 4: 2 SC in first stitch, SC in next 2 stitches, repeat around (8 SC)
Rd 5: SC in each stitch around (8 SC)
Rd 6: 2 SC in first stitch, SC in next 3 stitches, repeat around (10 SC)
Rd 7: SC in each stitch around (10 SC)
Fasten off and set aside for a moment

Small claw:
Magic ring, chain 1 in ring, make 4 SC in ring, continue to crochet in rounds

Rd 2: 2 SC in first stitch, SC in next, repeat around (6 SC)
Rd 3: SC in each stitch around (6 SC)
Rd 4: 2 SC in first stitch, SC in next 2 stitches, repeat around (8 SC)
Rd 5: SC in each stitch around (8 SC)
Do not fasten off.

Now you are going to connect the two claws. Begin to SC where you left off in big claw to begin attaching them. SC all the way around both claws. You should have 18 Single crochets but don't worry if your stitch count is off. It really doesn't matter :)
Rd 2: SC around (18 SC)
Rd 3: SC decrease in each stitch around
Start stuffing claw.
Rd 4-6: SC in each stitch around (9 SC)
Fasten off leaving long tail to sew onto body. Be sure to stuff with poly-fil and weave in loose ends as well.


Eyes (make 2):
Magic ring, chain 1, make 4 SC in ring, continue to work in rounds
Rd 2: 2 SC in each stitch around (8 SC)
Rd 3: SC in each stitch around (8 SC)
Rd 4: SC decrease, SC in next 2 stitches, repeat around
add safety eye, stuff with yarn scraps (or poly-fil), SC decrease and sew shut.

Legs (Make 2):
Magic ring, chain 1 in ring, make 4 SC in ring, continue to work in rounds
Rd 2: 2 SC in each stitch around (8 SC)
Rd 3-6: SC in each stitch around (8 SC)
Rd 7: SC Decrease, SC in next 2 stitches, repeat around
Fasten off, leaving tail to sew onto body. Stuff lightly with poly-fil.

Small legs (Make 2):
Magic ring, chain 1 in ring, make 4 SC in ring, continue to work in rounds
Rd 2: 2 SC in first stitch, SC in next stitch (6 SC)
Rd 3-5: SC in each stitch around (6 SC)
Fasten off, leaving tail to sew onto body. Stuff lightly with poly-fil.


I decided to add a little smile to my crab. I cut a small piece of black felt and hot-glued it on. You could also stitch on a small mouth with black yarn. Or leave it plain!


- See more at: http://www.repeatcrafterme.com/2013/08/crochet-crab-pattern.html#sthash.lDqjlvGu.dpuf

Hướng dẫn móc minion bằng len đẹp


Nguyên vật liệu:
Len màu vàng ( len Vĩnh Thịnh 1 sợi to khoảng 2 cuộn hơn)
Len xanh dương đậm (1 cuộn)
Len màu đen một ít
len xám một ít
Súng bắn keo, nút, vải dạ trang trí

Lưu ý: Móc vòng tròn bằng mũi đơn liên tiếp (xoắn ốc) chứ không nối vòng bằng mũi dời nhé :)

Thực hiện:

HEAD/BODY
Dùng len vàng

R1: 7 sc in magic ring. (7 sts)
R2: 2 sc in each sc around. (14 sts)
R3: *Sc 1, 2 sc in next sc*, rep 7 times. (21 sts)
R4: *Sc 2, 2 sc in next sc*, rep 7 times. (28 sts)
R5: *Sc 3, 2 sc in next sc*, rep 7 times. (35 sts)
R6: *Sc 4, 2 sc in next sc*, rep 7 times. (42 sts)
R7: *Sc 5, 2 sc in next sc*, rep 7 times. (49 sts)
R8: *Sc 6, 2 sc in next sc*, rep 7 times. (56 sts)
R9: *Sc 7, 2 sc in next sc*, rep 7 times. (63 sts)
R10-55: Sc 63

***Làm tóc minion: tùy theo mỗi con minion khác nhau thì có 1 kiểu tóc khác nhau, các bạn luồn tóc phia dưới lên rồi gút lại để tóc dính vào đầu minon. 

R56: *Sc 7, dec 1*, rep 7 times. (56 sts)
R57: *Sc 6, dec 1*, rep 7 times. (49 sts)
R58: *Sc 5, dec 1*, rep 7 times. (42 sts)
R59: *Sc 4, dec 1*, rep 7 times. (35 sts)
R60: *Sc 3, dec 1*, rep 7 times. (28 sts)
Bắt đầu nhỗi gòn từ từ vào nhé

R61: *Sc 2, dec 1*, rep 7 times. (21 sts)
R62: *Sc 1, dec 1*, rep 7 times. (14 sts)

Nhồi xong gòn

R63: *Dec 1*, rep 7 times. (7 sts)

Chiết hết, chừa đuôi dài, dấu len thừa

Quần yếm

Dùng len màu xanh

R1: 7 sc in magic ring. (7 sts)
R2: 2 sc in each sc around. (14 sts)
R3: *Sc 1, 2 sc in next sc*, rep 7 times. (21 sts)
R4: *Sc 2, 2 sc in next sc*, rep 7 times. (28 sts)
R5: *Sc 3, 2 sc in next sc*, rep 7 times. (35 sts).
R6: *Sc 4, 2 sc in next sc*, rep 7 times. (42 sts)
R7: *Sc 5, 2 sc in next sc*, rep 7 times. (49 sts)
R8: *Sc 6, 2 sc in next sc*, rep 7 times. (56 sts).
R9: *Sc 7, 2 sc in next sc*, rep 7 times. (63 sts)
R10-22: Sc 63
Móc từng hàng, tiếp theo quần để tạo yếm.
Row1: Sc 17, ch 1, turn. (17 sts)
Row2-7: Sc 17, ch 1, turn. (17 sts).

Kết thúc, dấu len. làm thêm 1 phần phía đối diện.

Row1: Ch 1, sc 16, ch 1, turn. (17 sts)
Row2-7: Sc 17, ch 1, turn. (17 sts)

Dây đeo trên quần (make 2)
Len xanh

Ch 3
R1-28: Sc 2, ch 1, turn.
Khi được sợi dài khoảng 6.5 inche thì tạo lỗ để làm khuy nút.

Túi trước:
Len xanh
Ch 9
R1-4: Sc 8, ch 1, turn. (8 sts)
R5: Dec 1, sc 4, dec 1. (6 sts). Kết thúc, giấu len
Túi bên (make 2):
Len xanh
Ch 9
R1: Sc 8
Fasten off and weave in ends.

Hoàn thiện quần:
May 2 nút vào trước quần
May 2 sợi dây vào phía sau quần.
Dùng len vàng may viền túi trước, và túi 2 bên
Làm logo Gru bằng vải dạ
May hoặc dán túi vào phía trước quần.

Phần tay (make 2)
Len vàng
R1: 7 sc in magic ring.
R2-24: Sc 7
chiết hết, chừa đuôi dài để may đính tay vào mình

Bàn tay (make 2)
Len đen
R1: 5 sc in magic ring. (5 sts)
R2: 2 sc in each sc around. (10 sts)
R3: *Sc 1, 2 sc in next sc*, rep 5 times. (15 sts)
R4-5: Sc 15
R6: *Sc 1, dec 1*, rep 5 times. (10 sts)
R7: Sc 10
Chiết hết, giấu len

Ngón tay (make 4)
Len đen
R1: 6 sc in magic ring. (6 sts)
R2: *Sc 2, 2 sc in next sc*, rep 2 times. (8 sts)
R3-4: Sc 8
Chiết hết, chừa len để may.

Ngón cái (make 2)
Len đen
R1: 6 sc in magic ring. (6 sts)
R2-3: Sc 6
Chiết hết, chừa len để may
May tay (bao tay)
May 2 ngón tay, ngón cái vào bàn tay
May phần bao tay đen vào cánh tay
May tay vào mình

Chân/giày (make 2)
Len đen
Ch 7
R1: Sc 6 starting in second chain from hook (choose one side), then work 6 sc on opposite side of chain. (12 sts) (móc 2 bên của chuỗi bính.
R2: Sc 12
R3: Sc 2 in each sc around. (24 sts)
R4: Sc 24
R5: *Sc 1, 2 sc in next sc*, rep around. (36 sts)
R6-7: Sc 36
R8: Through back loops only, sc 36.
R9: Sc 14, *dec 1* 4 times, sc 14. (32 sts)
R10: Sc 12, *dec 1* 4 times, sc 12. (28 sts)
R11: Sc 10, *dec 1* 4 times, sc 10. (24 sts)
R12: Sc 24
Chuyển sang len xanh
R13-15: Sc 24
Chiết hết, nhồi gòn, may vào quần xanh.

Trang trí mặt:
Cắt vải dạ (vải nỉ) 2 miếng tròn màu trắng to, và 2 miếng tròn màu đen nhỏ để làm mắt. Dán vào mặt
Dùng vải nỉ màu đen cắt hình miệng, vải trắng cắt răng, dùng keo dán răng vào phần trên miệng
Dùng vải nỉ màu đỏ cắt hình lưỡi, dán vào phần dưới của miệng.
Dán miệng vào mặt minion

Mí mắt (2 trên, 2 dưới): dùng len vàng

Mí trên (dài hơn)
Ch 11
R1: Sl stitch to first ch from hook, sc 9, sl st 1.
Chiết hết, dùng keo dán vào phía trên mắt.

Mí dưới (ngắn hơn)
Ch 10
R1: In second ch from hook, sc 9.
Chiết hết, dùng keo dán vào phía dưới mắt.

Tròng kính (make 2) dùng len xám
Ch 31
R1-2: Sc 30, ch 1, turn. (30 sts)
R3: Sc 30
Chiết hết.
R4: Join yarn in third ch from hook with slip stitch. Chain 1, sc 25 (26 sts with two extra stitches on each side from previous rows). Ch 1, turn.
R5-7: Sc 26, ch 1, turn. (26 sts)
R8: Sc 26
Chiết hết, chừa len dài để may. Gập đôi theo chiều dài rồi may lại. Rồi may tròn. Cuối cùng thì may 2 tròng kính dính vào nhau.

Dây vòng kính dùng len đen
Ch 5,
R1-63: Sc 4, ch 1, turn.
R64: Ch 4
Chiết hết, chừa len dài để may, Thử sao cho vừa vòng đầu minion nhé. May vào tròng kính

Chi tiết 2 bên kính (make 2) dùng len xám
Ch 5,
R1: Sc 4, ch 1, turn.
R2: Sc 4
Chiết hết, chừa len dài, gập đôi lại may dính. May vào 2 bên tròng kính

Thế là xong rồi. bạn có thể làm nhiều con, nhiều kiểu tóc, biểu cảm gương mặt khác nhau thì bạn sẽ có 1 đội quân minion cho riêng mình rồi

 
Xteen handmade : Xteen hand made | sách đan móc | crochet
Copyright © 2011. xteen handmade - All Rights Reserved
Chúng tôi chuyên Mua bán đồ hand made Mua bán nguyên phụ liệu hand made Cảm ơn các bạn ghé qua
Chúng tôi luôn chào đón bạn cùng niềm đam mê hand made